

Diablo 4 Guide: How to Get Anathema of the Primes Fast

Anathema of the Primes is a powerful unique two-handed sword exclusive to Diablo 4’s endgame meta. This iconic weapon boasts exceptional damage stats and unique affixes that greatly boost crowd control and boss damage output. It is a top-tier gear choice for many melee and hybrid builds, making it highly sought after by endgame players.

Unlike common random-drop unique items, Anathema of the Primes has fixed drop sources. Blind open-world farming wastes massive time and resources. Mastering targeted farming methods is the key to obtaining this Diablo 4 Items in the shortest time possible.

Understand the Core Drop Source

Currently, the only reliable boss that drops Anathema of the Primes is Echo of Andariel. All other in-game activities only offer extremely low drop chances, which are not worthy of dedicated farming. Echo of Andariel resides in Hanged Man’s Hall in Kehjistan, serving as the primary target for all fast-farm strategies.

A critical rule for drops is the difficulty threshold. This unique sword only drops on Torment 1 or higher difficulty. Lower world tiers and difficulty modes have zero drop rate, so players must unlock and enter Torment difficulty before starting their farming journey.

Farm Greater Lair Keys Efficiently

Challenging Echo of Andariel and looting her treasure hoard requires a Greater Lair Key. This key is the core prerequisite for repeated Andariel runs, so efficient key farming directly speeds up weapon acquisition.

Greater Lair Keys drop from lesser endgame lair bosses, including Lord Zir, Grigoire, and the Beast in Ice. Players can farm these bosses in rotation to steadily accumulate keys. To further boost key drop rates, push difficulty to Torment 6 or higher. Higher Torment tiers significantly increase rare key drop chances without excessive difficulty spikes for well-built characters.

Avoid farming on low Torment tiers. The sparse key drops will drastically slow down your overall farming progress. Always balance your build’s survivability and difficulty to maintain consistent run speeds.

Optimize Echo of Andariel Runs

Once you have a stock of Greater Lair Keys, focus on streamlined Echo of Andariel runs. Build a fast, burst-oriented character setup to clear the boss within seconds. High movement speed and single-target damage are essential to cut down run time.

Skip unnecessary trash mobs in Hanged Man’s Hall. Head straight to the boss arena to trigger the fight. After defeating Andariel, use the Greater Lair Key to open her treasure hoard, which holds the highest chance of dropping Anathema of the Primes.

Alternative Supplemental Farming Methods

For players waiting for key respawns or wanting extra drop chances, Helltide Events are a great supplemental option. Active every hour, Helltides let players collect Aberrant Cinders to open premium chests. Though the drop rate is lower than Andariel runs, it adds extra chances without extra key costs.

The Horadric Cube system also offers a backup method. Players can craft and reforge rare two-handed swords through the cube. While not guaranteed, this method lets players utilize cheap Diablo 4 materials to chase the unique sword passively.

Final Fast-Farm Tips

Prioritize Torment 6+ Andariel runs as your main farming loop. Stock up 10 to 20 Greater Lair Keys in advance to avoid frequent key farming interruptions. Optimize your build for speed and burst damage to maximize daily run counts.

Avoid random dungeon and open-world farming. Sticking to targeted boss fights and supplemental Helltide activities is the fastest and most efficient way to secure Anathema of the Primes in Diablo 4’s endgame.
Continue Reading

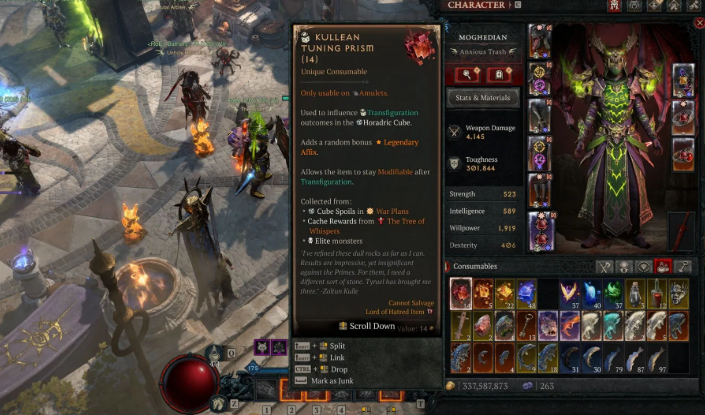
All Diablo 4 Affix Categories and How Tuning Prism Crafts Work

Crafting in Diablo 4 Season 13 has become far more advanced thanks to the introduction of the Horadric Cube and Tuning Prism systems. Instead of relying entirely on random drops, players can now manipulate gear affixes more strategically by targeting specific stat categories during crafting. Understanding affix categories is now one of the most important parts of optimizing endgame builds, especially for players pushing higher Torment difficulties and maximizing powerful Diablo 4 Items.

However, many players still misunderstand how affix categories actually work. The names of stats can often be misleading, and using the wrong Tuning Prism can easily waste expensive crafting materials. Since crafting costs continue increasing in Season 13, efficient players are becoming much more careful about resource management. Some even choose to buy D4 materials so they can focus more on build optimization and less on repetitive farming.

This guide explains every major affix category in Diablo 4 and how Tuning Prism crafting works in the current meta.

What Are Affix Categories in Diablo 4?

Affix categories are stat groupings used by the Horadric Cube crafting system. Each affix belongs to a specific category, and Tuning Prisms interact with these categories during rerolls and affix manipulation.

The main categories include:

·Offensive

·Defensive

·Utility

·Resource

·Mobility

Some affixes also fall into specialized subcategories like skill affixes or core-stat targeting. Understanding which stats belong to which category is critical because the Cube recipes use category rules to determine what gets rerolled or modified.

Offensive Affix Category

Offensive affixes focus on increasing damage output and combat effectiveness. These are some of the most valuable stats for endgame builds because they directly improve clear speed and boss damage.

Common Offensive affixes include:

·Critical Strike Chance

·Critical Strike Damage

·Vulnerable Damage

·Attack Speed

·Damage Over Time

·Weapon Damage

·Elemental Damage Multipliers

·Thorns

·Core Stat bonuses like Strength or Intelligence

Many players target Offensive affixes when crafting weapons, gloves, rings, and amulets. These stats are especially important for builds like:

·Rapid Fire Rogue

·Whirlwind Barbarian

·Chain Lightning Sorcerer

·Minion Necromancer

Optimizing offensive Diablo 4 Items often requires repeated rerolls and expensive crafting attempts, which is why crafting resources are now considered one of the most valuable currencies in the game.

Defensive Affix Category

Defensive affixes focus on survivability and mitigation.

These include:

·Armor

·Damage Reduction

·Maximum Life

·Dodge Chance

·Life Regen

·Life on Hit

·Elemental Resistances

·All Resistance bonuses

As Torment scaling becomes more dangerous in Season 13, defensive stats have become increasingly important. High-end builds can no longer rely entirely on raw damage output. Players now balance survivability and offense much more carefully than in previous seasons.

Many players specifically craft defensive affixes onto:

·Chest armor

·Pants

·Helms

·Shields

This allows builds to survive elite affixes, boss mechanics, and high-tier dungeon encounters more consistently.

Utility Affix Category

Utility affixes support overall build consistency and gameplay quality.

This category includes:

·Cooldown Reduction

·Lucky Hit Chance

·Potion Capacity

·Healing Received

·Fortify Generation

·Skill Rank bonuses

·Impairment Reduction

Cooldown Reduction remains one of the strongest utility stats in Diablo 4 because it dramatically improves skill uptime for many meta builds.

Players crafting Utility-focused Diablo 4 Items often prioritize:

·Amulets

·Helms

·Gloves

These slots commonly roll valuable cooldown and skill-enhancing affixes.

Community discussions also note that some Utility affixes behave inconsistently during crafting, especially Fortify Generation and Impairment Reduction. Several Reddit users recommend testing rerolls on lower-value items before risking expensive endgame gear.

Resource Affix Category

Resource affixes help maintain skill usage and improve resource sustainability.

Common Resource affixes include:

·Resource Generation

·Resource Cost Reduction

·Maximum Resource

·Lucky Hit Restore Resource

·Resource per Kill

These affixes are especially valuable for:

·Sorcerers

·Rogues

·Spiritborn builds

·Core-skill spam setups

Resource management became even more important after Season 13 balance changes increased the importance of sustained damage output during longer boss fights.

Many players now prioritize resource affixes on rings and amulets to maintain smooth gameplay loops.

Mobility Affix Category

Mobility affixes focus on movement speed and evade mechanics.

This category includes:

·Movement Speed

·Evade Cooldown Reduction

·Additional Evade Charges

·Evade Movement bonuses

Mobility stats are often underestimated, but they dramatically improve:

·Dungeon clear speed

·Helltide farming

·Boss positioning

·Seasonal efficiency

Fast farming builds frequently invest heavily into movement speed because faster clears generate more Diablo 4 Items, gold, and crafting materials per hour.

How Tuning Prisms Work

Tuning Prisms interact with affix categories during Horadric Cube crafting. Different prism types influence different categories of stats.

For example:

·Offensive prisms target damage-related affixes

·Defensive prisms target survivability stats

·Utility prisms target cooldowns and support bonuses

The important detail is that the Cube recipe itself determines how the prism behaves.

According to community testing:

·Focused Rerolls replace an affix with another from the same category

·Chaotic Rerolls remove a targeted category affix and replace it with a random category stat

This distinction is extremely important because misunderstanding the recipe can ruin valuable gear.

Why Crafting Materials Matter More Than Ever

The Horadric Cube system is powerful, but it is also expensive.

Players now spend huge amounts of:

·Gold

·Forgotten Souls

·Legendary crafting components

·Tuning Prisms

·Endgame reagents

Perfectly optimizing Diablo 4 Items can require dozens or even hundreds of rerolls.

Because of these costs, many players choose to buy D4 materials to speed up crafting and reduce repetitive farming time. This allows them to focus more heavily on pushing endgame content and experimenting with new builds.

Best Items to Craft With Tuning Prisms

The best crafting targets are usually:

·Amulets

·Rings

·Gloves

·Weapons

These slots have the highest impact on build performance because they can roll multiple high-value affixes simultaneously.

Players should avoid wasting expensive prisms on weak or temporary gear. Most veteran players recommend saving advanced crafting resources for:

·Greater Affix items

·Mythic Uniques

·High-item-power Ancestral gear

Final Thoughts

Affix categories are now one of the core systems driving Diablo 4’s endgame crafting. Understanding how Offensive, Defensive, Utility, Resource, and Mobility affixes interact with Tuning Prism recipes is essential for optimizing gear efficiently.

Continue Reading

How to Farm Twin Strikes in Diablo 4 Season 11

The Twin Strikes is a top-tier ancestral unique glove designed exclusively for Barbarians in Diablo 4 Season 11. With its powerful offensive stats, attack-speed scaling, and devastating Double Swing synergy, this item is perfect for melee builds focused on rapid attacks and burst windows. For players aiming to maximize their Barbarian’s DPS, understanding how to efficiently farm Twin Strikes is essential. This guide breaks down its modifiers, unique effects, and the best farming methods.

What are Twin Strikes in Diablo 4?

Twin Strikes is an offense-focused unique glove that amplifies the Barbarian’s Double Swing skill. If your build relies on spamming Double Swing, this glove becomes a near-essential power spike.

By improving attack speed, adding extra hits, and boosting Strength, Twin Strikes turns normal rotations into high-burst damage sequences, especially when combined with Vulnerable, Berserking, or crit-focused setups.

Twin Strikes Unique Modifiers

The base roll ranges for Twin Strikes include:

·+20% Attack Speed (up to +30% with mastercrafting)

·+20% Chance for Double Swing to Deal Double Damage (up to +30% with mastercrafting)

·+121 Strength (up to +182 with mastercrafting)

·+3 to Double Swing (up to +4 with mastercrafting)

These modifiers directly enhance Double Swing DPS, increasing both sustained damage and high-burst spikes. The Strength bonus benefits all Barbarian abilities, while the double-damage chance synergizes with attack speed and critical hit multipliers.

Twin Strikes Unique Effect Explained

Twin Strikes features a unique effect that drastically boosts burst damage:

·Effect: After casting Double Swing four times, each subsequent Double Swing hits two additional times, dealing 140% increased damage for 3 seconds.

Practical Implications:

·Every four casts of Double Swing triggers a high-damage window

·Bonus hits allow quick elimination of elites or stagger bosses

·Perfect for high-speed melee builds that maintain Fury uptime

If your Barbarian emphasizes speed, mobility, and constant close-range pressure, Twin Strikes elevates both AoE and single-target performance.

How to Get Twin Strikes in Diablo 4

Twin Strikes is an ancestral unique, meaning it only drops at World Tier 4 (Torment) or higher. While multiple sources can yield it, some methods are far more efficient than others.

1. Farm Endgame Boss Hordes (Highest Drop Rate)

Boss hordes provide the most consistent chance for uniques. Summoning these bosses requires specific Diablo 4 materials, but they remain the fastest method for targeting Twin Strikes.

Bosses That Drop Twin Strikes:

·Grigoire, the Galvanic Saint – Hall of the Penitent (Dry Steppes), Torment+, 12x Living Steel

·Varshan – Malignant Burrow (Writhing Mire), Torment+, 12x Malignant Hearts

·Urivar – Fields of Judgement (Teganze Plateau, Nahantu), Torment+, 12x Judicator’s Masks

·Harbinger of Hatred – Harbinger’s Den (Lingering Hatred, Nahantu), Torment+, 3x Abhorrent Hearts

Players can also choose to buy Diablo IV Items to speed up summoning materials, improving farming efficiency for this specific unique.

2. Random World Drops

Twin Strikes can appear as random world drops:

·Standard enemies

·Elite monsters

·Chests

The drop chance increases at higher World Tiers, making Torment+ zones the best for spontaneous loot.

3. Nightmare Dungeons

Nightmare Dungeons are another reliable farm method due to:

·Dense elite packs

·Frequent loot explosions

·Guaranteed Rare and Legendary rewards

·End-of-dungeon bonus loot

Prioritize dungeons with melee-heavy enemies for better Barbarian gear alignment.

4. Gathering Legion Events

These timed events spawn large numbers of elite enemies quickly. For rapid loot accumulation, Legion events are excellent, especially when focusing on glove drops.

5. Helltide Events (Top World Farming Method)

Helltides provide the most consistent glove-focused drops:

·Tortured Gift of Gloves chests

·Elite ambushes

·High-density mob clusters

Targeted Helltide farming ensures maximum efficiency without excessive grinding.

6. Gamble Gloves Using Obols

If you have a surplus of Obols, you can gamble for gloves at the Purveyor of Curiosities. This method is highly RNG-dependent and less reliable than bosses or Helltides, but it can yield Twin Strikes occasionally.

Final Tips for Efficient Farming

1. Prioritize Torment+ World Tier to maximize drop chances

2. Focus on boss horde summoning materials for repeatable farming

3. Include Helltides and Nightmare Dungeons in your rotation for loot density

4. Consider buying Diablo IV Items to save time on summoning or gear preparation

5. Use DPS-friendly builds to shorten farming time per event

Conclusion

The Twin Strikes glove is one of the most potent unique items for Barbarian builds centered on Double Swing. Its combination of attack speed, extra hits, and Strength scaling transforms standard rotations into high-burst AoE sequences.

Efficient farming strategies include endgame boss hordes, Helltides, Nightmare Dungeons, and optional gambling via Obols. By targeting these sources in World Tier 4 or higher, players can consistently obtain Twin Strikes and maximize their Barbarian’s combat effectiveness in Diablo 4 Season 11.

Continue Reading

Diablo 4 Season 9: Best Endgame Bash Barbarian Build Guide

Turn Basic Attacks into Devastating Earthquakes

In Diablo 4 Season 9, the Barbarian remains a brutal force of destruction, but one build stands out for its raw simplicity and overwhelming effectiveness: the Bash Barbarian. While many endgame builds focus on flashy Core Skills and elaborate combos, the Bash build proves that sometimes, a well-placed hit is all you need, especially when you can make the ground quake with every swing.

This guide breaks down everything you need to know about the Best Endgame Bash Barbarian Build: skill choices, gear, passives, Paragon boards, and how to leverage Season 9’s mechanics to turn a basic attack into an arena-clearing powerhouse.

Overview: Why Bash?

Bash is a Basic Skill that doesn’t typically grab headlines, but with the right synergy with Diablo 4 Items, it becomes a fury-generating, boss-splitting, AoE-blasting juggernaut. What makes it truly viable in Season 9 is the synergy between:

·Shard of Verathiel – Converts Bash into a high-damage, Fury-consuming attack.

·Hooves of the Mountain God – Converts Bash into an AoE-cleaving monster.

·Runeword: CirTec – Allows Earthquakes to erupt as you rotate through skills.

To buy D4 materials as above, you can deliver devastating blows to single targets and entire groups, while constantly triggering Earthquakes that melt everything around you.

Core Playstyle

The Bash Barbarian revolves around building Fury, maintaining Berserking, and unleashing frequent Earthquakes for AoE devastation. Your Bash attacks are buffed through gear and Aspects to hit multiple enemies and apply Overpower, crits, and extra effects-perfect for slamming down elites and bosses alike.

Active Skills Setup

·Combat Bash (5/5): Main damage skill. Guarantees Overpower on 3rd hit with high weapon damage scaling.

·Violent Hammer of the Ancients (1/5): Used only after Bash builds up an Overpower. Huge burst with cooldown.

·Strategic Ground Stomp (1/5): Stuns enemies and reduces Wrath of the Berserker cooldown. Good Fury generator.

·Power War Cry (5/5): Massive damage boost for a few seconds. Use before engaging elites or bosses.

·Tactical Challenging Shout (1/5): Provides extra Fury and damage reduction. Use proactively.

·Supreme Wrath of the Berserker (5/5): Keeps you Berserking and boosts all damage. Use on cooldown.

How to Play It

1. Start fights with Challenging Shout and Ground Stomp to generate Fury and reduce cooldowns.

2. Trigger War Cry before a major engagement for a burst of damage.

3. Activate Wrath of the Berserker to enter a high-damage, Berserking state.

4. Spam Bash to deal damage, generate Fury, and trigger Earthquakes.

5. Use Hammer of the Ancients only after a guaranteed Overpower is ready from Combat Bash.

Key Passives

·Warpath (3/3): Increases Fury gen and makes movement smoother during attacks.

·Endless Fury (3/3): Gives more Fury from Basic Skills.

·Belligerence (3/3): Increased damage while Berserking.

·Booming Voice (3/3): Longer shout durations.

·Aggressive Resistance (3/3): Damage reduction while Berserking.

·Prolific Fury (3/3): More Fury generation while Berserking.

·Pit Fighter (3/3): Increased damage to close enemies.

·No Mercy (3/3): Bonus crit chance against CC’d enemies.

·Heavy Handed (3/3): Crit damage with 2H weapons.

·Wallop (3/3): More damage with 2H Bludgeoning weapons.

·Unconstrained (Ultimate Passive): Increases Berserking duration and boosts its effects. Core to the build.

Weapons & Arsenal System

Main Skill Weapon:

Bind Bash to a 2H Bludgeoning weapon (ideally one with high base damage and Earthquake synergy).

Arsenal Bonus Options:

·Polearm – For increased Lucky Hit and Fury generation.

·2H Axe – Bonus damage to Vulnerable enemies.

·2H Sword – Use this if you’re spec’d into Bleed nodes in Paragon.

Best Gear & Legendary Aspects

·Helmet: Ugly Bastard Helm (core unique)

·Chest: Aspect of Might (damage reduction)

·Gloves: Accelerating Aspect (AS boost after crit)

·Pants: Hectic Aspect (cooldown reduction)

·Boots: Hooves of the Mountain God (cleave Bash)

·Amulet: Aspect of Adaptability (bonus vs. elites)

·Rings: Vehement Brawler’s + Rapid Aspect

·2H Bludgeoning: Aspect of Earthquakes

·2H Slashing: Aspect of the Moonrise

·1H + Offhand (optional): Shard of Verathiel + Executioner’s Aspect

Priority Uniques:

·Hooves of the Mountain God – AoE Bash cleave.

·Shard of Verathiel – Supercharges Bash damage using Fury.

·Paingorger’s Gauntlets (optional) – Boosts damage after resource dump.

Stat Priority

Target these stats on your gear:

·+Ranks to Bash, Heavy Handed, and Belligerence

·Chance for Bash to hit twice

·Wrath of the Berserker CDR

·Damage while Berserking

·Crit Chance and Crit Damage

·Chance to Restore Primary Resource

·Strength

·Armor & Resistances

·Max Life

Runeword: CirTec

CirTec is vital for turning your Fury rotation into an Earthquake-producing machine:

·Effect: After casting 5 Skills, gain 300 Offering and trigger an Earthquake.

·Overflow Effect: Overflowing Offerings increases the Earthquake size/duration.

This allows constant Earthquake uptime while rotating Bash, War Cry, Ground Stomp, and Shouts.

Paragon Boards and Glyphs

Here’s a great endgame Paragon path for this Bash build:

·Starter: Exploit (Vulnerable uptime)

·Decimator: Rumble (bonus damage per Earthquake)

·Blood Rage: Blood Rage (damage boost per Fury spent)

·Might: Might (2H weapon synergy)

Other Glyph Options:

·Territorial – More damage to close enemies.

·Crusher – Bonus damage with Bludgeoning weapons.

·Ire – Extra Berserking effect.

Take blue (Magic) nodes for resource gen and yellow (Rare) nodes for increased damage or survivability. If you’re dying often, replace some offensive nodes with Life or Armor.

Final Thoughts

The Bash Barbarian is a deceptively simple build that gets better the deeper you go into Diablo 4’s endgame. With powerful Earthquake synergy, strong single-target burst, and solid AoE, this build is ideal for clearing Nightmare Dungeons, boss runs, and even PvP with a few tweaks.

However, its reliance on specific gear makes it less viable for leveling. Once you’ve assembled the core components-Hooves of the Mountain God, Shard of Verathiel, and CirTec-you’ll be unstoppable.

Continue Reading

“Diablo 4” Season 6 Spiritborn Reclamation BD Recommendation

The “Diablo 4” Body of Hate DLC is launched together with the sixth season, so how can the new professional wizard open up land in the new season? Please take a look at the “Diablo 4” Season 6 Spiritborn Reclamation BD shared by “fishing champion Xuxu” below. I hope it will be useful to everyone.

The Death Touching Poison Insect stream can be easily upgraded to level 60, including equipment selection, skill point adding sequence and land reclamation ideas, as well as the transformation ideas for subsequent armor damage increase. The mainstream ideas for land reclamation are Feiyu and Death Touch. I like this set of Death Touch better. It has better survivability, barrier and recovery, and I can almost reach level 60.

First enter the game and follow the plot to upgrade the main line. If you are an old player and have full Lilith reputation, after entering the game, first use Feiyu to clear the land, get to level 9, and then change to death touch points after accumulating 19 skill points. . If the newbie has not unlocked the reputation, he may need more than 20 levels to transform.

Then let’s talk about the core power: the power of Insatiable Greed, which can be unlocked by clearing the dungeon Tomb of Betrayal. Try to get rid of him before reaching level 20. Find an opportunity to extract a necklace or ring and wear it all the time. He can achieve an explosion by using Death Touch to refresh the poison effect. AOE and single targets are very powerful.

At level 15, remember to follow the guidance and complete career-specific tasks to unlock the spiritual passive. Choose the mad ape as the main god and the cheetah as the deputy.

Kuang Yuan’s shield and the blood regeneration of his poisonous snake system will bring us a very high blood regeneration and barrier during the land reclamation period. The survivability is very strong and silky.

In terms of other power choices, courage, disobedience, and dominance are the three most comfortable defensive powers for clearing the land. In the early stage, resources are tight, so give priority to courage and dominance. Try to fight again at level 40-50 if you can’t bear it, otherwise the equipment will be used frequently. Replacement would be a waste of resources.

Touch of Death is a skill that is relatively low in energy. If we can hit the three powers of Starlight, Lunar Eclipse, and Adaptation, we can overuse them. Death touch and basic skills are used alternately.

Among the damage-increasing powers, Insect Poison Infection, Unyielding Slam, Advantage Master, Shao Kuang, and even Xin Ru Shui Shui, Elements, and Transformation Energy can all be used to open up wasteland and increase damage, and the adaptability is very high. Use what you throw away in land reclamation.

In terms of weapons, do not use power, just use the highest level dropped equipment, and be sure to change it frequently. Just look at the green words that have been added.

In terms of skill selection, we add points according to this, giving priority to adding various active skills, slowly adding various passive damage increases, and finally adding damage reduction.

For the upgrade route, in addition to the main missions, you can also pay attention to: Legion events, Whispering Ancient Trees, Hell Frenzy, World Bosses, and the new gameplay of the alien walker that refreshes purple over time on the map. After defeating it, you can enter the portal to complete the mission to obtain equipment and opals. Waiting for rewards. At the same time, follow the main line as early as possible to unlock the mercenary system, and level up the mercenaries to level 10. During this period, you can experience and find the mercenaries you like.

It is worth noting that opal is a very powerful gain prop that can increase experience gain and drop rate. You should plan accordingly according to the amount in your pocket. Then, it is also very important to increase the experience of various potions in the new season. Remember to drink them after making them at the pharmacist. It can add up to 28% of extra experience, and keep the potions constantly helping to open up land quickly. In addition, as a new version of the paid profession, the spirit witch is basically as powerful as other professions, so the land reclamation process will be very smooth.

After reaching the full level, you can quickly take off by replacing 750 equipment and gathering power. For the very powerful armor-style Death Touch in the middle stage of silky transition, you only need to gather this weapon, ring, and this helmet.

If you want to buy diablo 4 gold, diablo 4 items, diablo 4 boosting, diablo 4 runes, diablo 4 unique items, you can go to MMOexp, the professional game service website.

Continue Reading